There has been a spot waiting to be filled on the verandah, it was waiting for an Earth oven to be built there. We had a new friend Carrie coming to stay for a week and it seemed the perfect time to build this as she has built 9 ovens now!! You can have a look at her work on Facebook heArth eArth Art https://www.facebook.com/hearthearthart. I wanted to share the knowledge with my neighbours so everyone was invited to come and take part in the process so that those who wanted could go away and build their own. Its a great project for anyone interested in natural building as a way to get to know the materials. I really loved the whole process, kiko Denzer's book 'Build your own earth oven' was our guide and Carries experience meant that she had lots of helpful tips throughout. The only cost in building this oven are the 15 fire bricks used only for the floor of the oven, the rest of the materials are from the earth!
 |
| Before Carrie arrived I prepared the base so that we would have enough time to concentrate on the oven. Here I filled the space on the verandah with rubble and gravel and rammed it in place to make a solid base. |
 |
| I tried my hand at a small dry stone wall for the foundation which is fun to play around fitting the rocks together until they don't move. |
 |
| Filling up with rubble and gravel as I went up course by course. |
 |
| The final stage before Carrie arrived, a containment ring to hold the sub-floor insulation, here I used bricks that a neighbour had left over from a building project. |
 |
| Mixing Saw dust and clay for the subfloor insulation |
 |
| Glass bottles laid in the sawdust and clay mix, they trap air and stop the heat being lost through the foundation |
 |
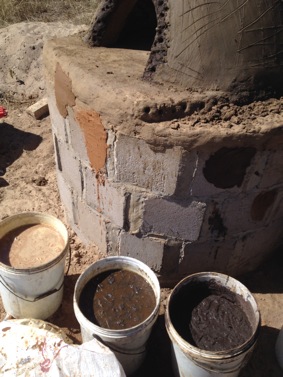
| Dense oven mud, a mix of sand and clay form the base where the firebricks will go. The chicken wire was to help reinforce the wall. |
 |
| building up as we go along |
 |
| a thin layer of fine sand forms the bed where the firebricks will go |
 |
| each brick is carefully placed in position |
 |
| making sure all the bricks are surrounded by the insulation mix to stop heat loss |
 |
| Building the form up that will act like a mould on which the oven walls are built. pieces of wood and bricks help to fill out the shape, then damp sand is packed in. The size of this oven is 22.5 inches in diametre(57.15cm) and the best height for the dome is 16 inches (40.64 cm) the peice of wood in the centre is used to guide the right height. |
 |
| Carrie smoothing the form with a small plank |
 |
| Laying newspaper to stop the first layer sticking to the form. Carrie finds that 4 layers work best. |
 |
| The first layer is 4 fingers wide, a mix of sand and clay, the same mix I used for the sun-dried bricks for the house. |
 |
| Smoothed down and packed in nicely to make a solid form. |
 |
| Next layer is the sawdust and clay insulation mix to keep the heat in. |
 |
| once the first layer has started to dry out, the door can be cut. |
 |
pulling out all the sand form and newspaper, the dome holds it's shape.
|
 |
| The last layer is the decorative touch. I mixed clay and fine sand with cow manure. |
 |
| I made the door with insulation mix and dense oven mud supported by mesh inside. The handle is an old railway tie. |
 |
| The finished oven, tea-lights holders built into the side. |
 |
| The door is used for baking, once a fire has burnt inside for a couple of hours the fire is removed and baking can begin. The book states it can bake for between 8-12 hours. I didn't have enough flour to bake for that time, but I used it for a few hours and it worked wonderfully. |
 |
| Granadilla cake cooked perfectly inside |
 |
| The first loaf of bread yummy. |
 |
| We have enjoyed a couple of pizza nights since finishing the oven, the fire burns again for a couple of hours , but then a small fire is kept to one side of the oven whilst cooking the pizzas. |
 |
| Cooking pizza sauce on the solar cooker |
 |
| Pizza's in, they cook in a few minutes and come out delicious. Here it is placed on a peice of tin-foil to help placing it in and taking it out without burning hands. It's sooo hot in there, we need to make a paddle with a long handle then the pizza will be placed directly on the oven floor. |
 |
| blue-cheese, pine nuts and avocado pizza, recreating a memory of great pizza for Gogo. |
 |
| The well known Hawaian, Oliver's favorite. |
 |
| I have loved the whole building process of the oven, and now all the wonderful times we have had and will have around this oven, sharing good food with friends and family. Thank you Carrie for all your help! I'm now building another oven for friends at a safari lodge close by, will post about this next time. |
 |
| The latest addition to our family 'Insaba' meaning sunbeam |