Saturday, 25 October 2014

Sharing the .... Mud


It's been a while since I last posted, I've been working on the last layer of plaster on the inside and it's taken quite some time to get it just right. It's a lot of fun and satisfying to give it a personal touch and to see it looking almost finished!
I've been learning to share my plaster with the potter wasps of which there are quite a few who all have different methods of making their beautiful little nests for their babies. I kept hearing funny noises and saw that they were collecting balls of my plaster mix and flying off with them( I guess it's a compliment that they like my plaster mix so much!!). They are doing a great job as there have been a lot of caterpillars this season and they have been collecting them to put in their nests for when the young hatch. With all the indigenous fruit trees we have on our place they will also be pollinating these. 


Oliver watching a wasp make a huge nest under the shelf in his bedroom


A new fruit was added to this tree 
I used an old broken mirror to make some small decorations around the house, this dragonfly is being chased by a gecko sculpted in the plaster.

a star over a moon is an african symbol for love


I pressed a small triangular piece of mirror into the plaster to make this pattern around a shelf

Cowerie shells are embedded in the plaster for the body of this dragonfly
I cut out a stamp from an old piece of car tyre to make these lion footprints around the door


I lay these tiles and used the plaster as mortar which worked very well, clay on clay sticks very well! They are along the back of the kitchen counter


for this final plaster layer every batch of sand and clay is passed through a seive to get a good quality finish.


placing the reed mats for the ceiling was a bit of a mission, it took 3 of us but we got there in the end


I have just finished making an earthbag retaining wall around the house, These 50kg bags were filled with the earth that had been dug out to level the area. Just moistened and fill the bags, then ram in place, barbed wire between the layers is like velcro. It's quick but hard on the arms( as to make it quicker as we were only 2 people doing this we filled big buckets to fill the bags rather than small tins as it suggests in the instruction book I used!) 


A lot of friends and neighbours have been coming to see what I am doing, it' good to see interest and some go away saying they are inspired which is what it's all about so it further inspires me. 

I will be plastering the bags soon, they can't be left exposed too long otherwise they breakdown when exposed to UV, it feels very solid....

..... just in case I got an expert in to give it the final touch

Oliver applying a coat of paint to his room, I chose to make a light yellow paint for the bedrooms, it's a mix of  white clay and yellow sand that are found in the village.

It brightens up the room

October is our hottest month here, it's been reaching the mid 40's so far but inside the house is the coolest place to be. It's really great to see the combination of orientation to the sun and thermal mass of the walls really works. Sitting on this clay seat at mid day is blissful! 


Some friends who were visiting helped out by installing the pipes for the grey water from the kitchen to lead to the banana circle. 

These beautiful mermaid trees came into flower and a carpet of yellow petals led to the house, I am constantly blown away by the beauty of what is around us, and feel so strongly protective over all of this life.

As we are planning to move in the coming weeks, we need a space for our visitors, so Misheck came back and built a traditional pole and thatch structure

So we are almost ready to move in, there is still a long list of jobs I want to finish first but in the next few weeks we should be moving in! 


Saturday, 2 August 2014

Hand sculpting an earthen home

I have really enjoyed the whole building process but these final stages are really what have been looking forward too, plastering and sculpting details that make it our home. 


As I needed to wait for the walls to dry properly before plastering I carried on with other jobs, like laying the floors first. Here you can see the gravel base which we collected near by and rammed to make the base.

Leaving a space for the built in seat

ramming the base of the floor

The base is finished with a thin layer of concrete to then lay the tiles on.
Misheck came back to lay the tiles and did a great job. All the tiles are made locally, we put them in the living area and in one bedroom 


and we put tiles for the kitchen on the verandah


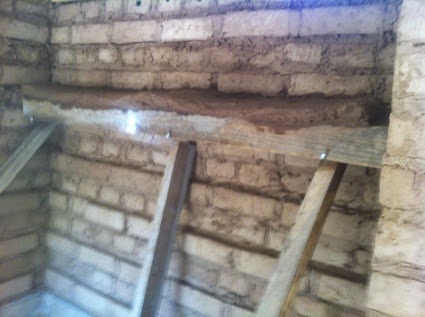
Making the clay shelves was really fun, I placed bricks underneath to support the earth mixture whilst they dried. These shelves are above the kitchen counter.

starting the second shelf

I also made shelves inside like this one above the area where the bed will be

I collected different coloured earth to test plasters and clay paints, there are beautiful colours and it's a lot of fun mixing and testing 
I installed the window frames using expansion bolts which worked very well.

I glazed all the windows including this one in the door


Here you can see the back of the ceiling panels I am trying out, they are reed mats that we have sewn empty and flattened milk cartons and other tetra packs to it. The idea is that it will be like a radiant heat barrier for the roof. 


Oly helping out with the layers of plaster inside,  I have been applying the layers by hand and making any hard edges rounded and soft. I did lots of tests for the best mix, using 4 buckets of pit sand from the plot and 1 of clay worked really well. I have done 2 layers inside so far.


Here I am making a base for our bed so that it is raised up and the central area will have space for a large drawer for storage
Making the base for the built in seat.
I made walls with the adobe bricks and then placed chicken wire between the layers. The spaces underneath the seat are going to be storage spaces.
Layering a clay and sand mixture to make the seat.


Playing around with pieces of an old broken mirror to see what I will lay into the wall


sculpting an 'ndoro in the wall with a piece of mirror in the centre

I placed pieces of mirror and cowrie shells between the bottles in the living area


a small decorative shelf that I am layering up with a small moroccan door inside


Applying the first layer of plaster to the outside, I will finish with a lime plaster  for extra protection.

More tiles for the verandah


I placed some small battery operated fairylights in one of the bottles above the kitchen counter, it makes a nice effect.


I managed to finish the first layer of plaster on the outside of the house and these extra tiles for a sitting area on the verandah. I'm happy with how the house is coming along, I still need to do some other layers of plaster on the inside and finish with a light yellow clay paint. The outside needs a lime plaster coat and I need to fit the ceiling panels, these are the main jobs to finish off. I am off for a long awaited break and will be back in a few weeks to finish these jobs, and build a store room and retaining wall around the house, then we will be ready to move in!!